Lets Impose That PDF!
Welcome back. Today we will impose a simple business card on a letter sized sheet, 2 sided.
My friends at
Qoppa have done yeoman's work on the imposition portion of the
PDF Studio Pro. They have furnished all the tools that you need to build a great imposition for many projects. If you are new to imposition, they have done a great job of making impositions quick and easy. It isn't difficult, but it is detail oriented, so we get into the minutiae of imposing. Our impositions will get more complex as we go, but we will use each blog lesson as a building block to future impositions.
A standard business card in the United States is 2" x 3.5". This particular card was created to be 2 sided.. You can download it
here
 |
| A1 Front side bleed business card |
 |
| A2 Back side bleed business card |
B1 is fairly straight forward, it is what you see when you open the pdf with PDF Studio, you see the document tab circled, that document tab! B2 highlights the reason we are here! That is the imposition part of the program, lets open this! So many possibilities! B3, just in case you missed it!
 |
| B1 Initial view in PDF Studio 2019. Select the document tab (circled in red) |
 |
| B2 Imposition button is found in the Print Production area, select and click on the Imposition button |
 |
| B3 Imposition Button, for emphasis! |
PDF Studio Pro offers a power tool in the imposition tab. We want to look at the finer detail of imposing a business card on letter sized card stock. In illustration C1 we have the initial view and you see I have highlighted 5 parts of this tab. It is not hard, but you want to proceed with caution at each of these highlights.
In layout, we see the 2-up Booklet, but there is also 4 up Booklet, 8 up Booklet, Cut & Stack, Sequential and Step and Repeat. It's a good idea to know what is there and poke around, get familiar with these options. For this job we will be using the
Step & Repeat layout. Quickly note that "General" "Paper" and "Advanced" tabs are highlighted along with "Profile Name." Just keep them in mind as we will be going in and out of each part and it will become second nature quickly
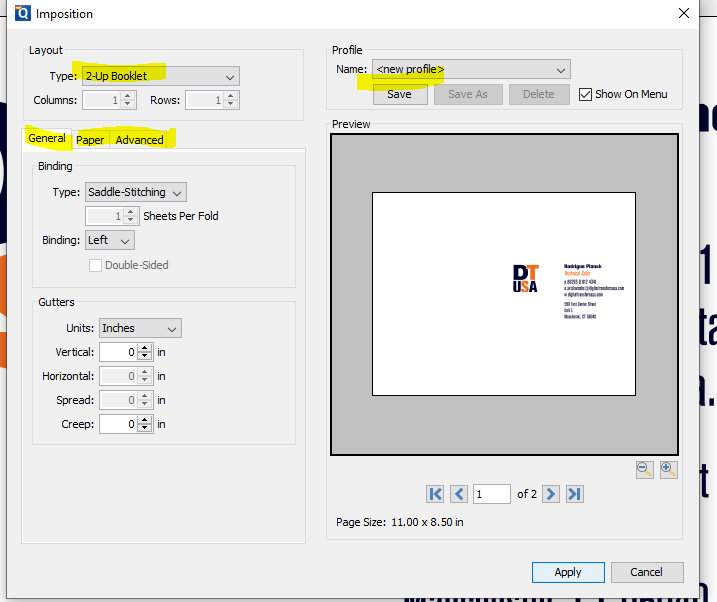 |
| C1 Initial view of Imposition. We are in the general tab |
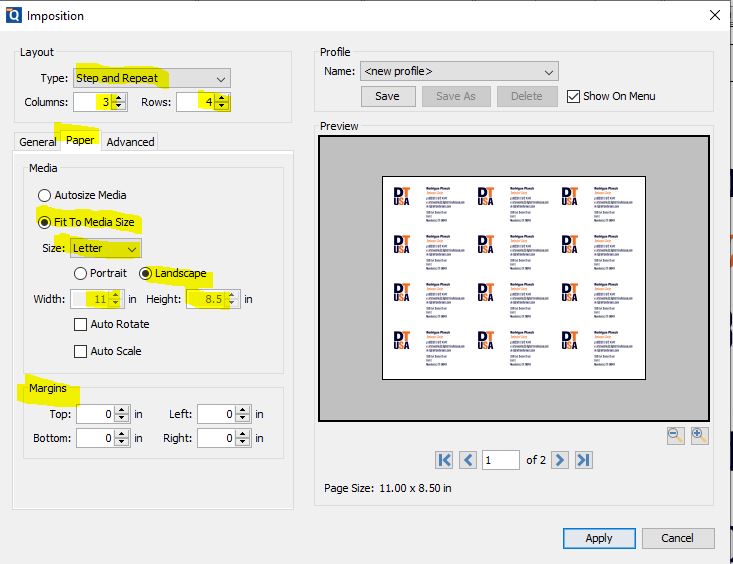
C2 the paper tab, we have before us some familiar and new options, most important for most every imposition, click off the "Auto Scale", it is a good feature, but for very precise impositions it is best to have the PDF be 100% of size. We will have a project where we impose a larger item into a smaller N_up sheet.
Note the size of the sheet we will be imposing (11" x 8.5") which is just right for our project.
 |
| C2 Paper Tab... Check off the Auto Scale... only use it as needed |
Illustration C3 shows us our first bit of imposition action! All right!!! In the general tab add "2" to the "Rows" and you will see what we have here on screen. C4 shows us a filled up sheet, this is what we want! We are almost to the point of saving the pdf and getting ready for printing. Almost.
Note that "Margins" is highlighted. We wont do anything with that right now, but it can get be a good secret tool.
 |
| C3 Step and repeat |
 |
| C4 Step and repeat fully expanded to the layout sheet.. |
C5 shows us the second side of the file (back side of the business card) and most importantly in the Advanced tab, Trim Marks. Trim Marks should for the most part (very few exceptions) 1/8" (.125) away from the artwork finished size. In bleed documents, the artwork will butt against the marks, but it is still 1/8" away from finished size artwork. PDF Studio automatically puts the artwork 1/8" from the edge of the finished size. Please note, Trim Marks (or crop marks) are the only marks you need to put on a sheet. Bleed Marks and Registration Marks are a hold over from a bygone era. I do use Page information for dating purposes on proofs for job tickets. Trim marks are on the page to give guidance to bindery workers. They want enough information (marks) but just enough to get the job done quickly. Nothing iritates a cutter operator than a job with unneeded marks.
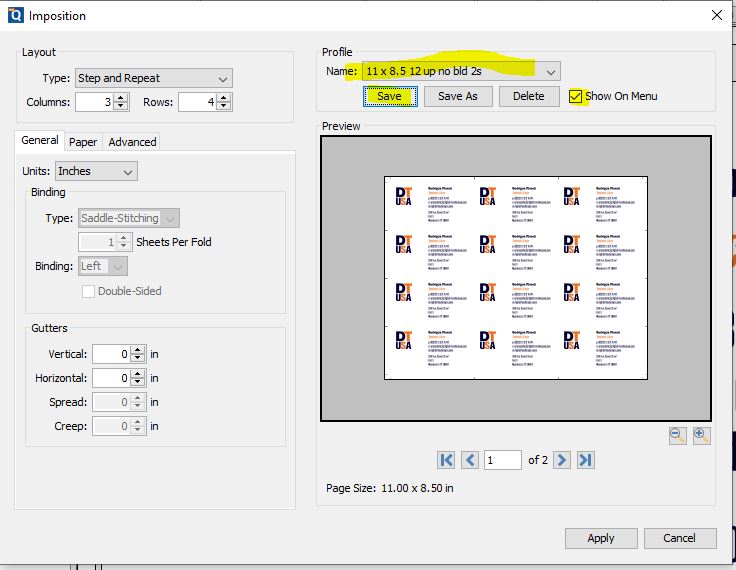
Now that we have an imposition that we like, our hard work is done. Who wants to repeat this kind of work? NOT ME! LOL.... This "profile" save feature allows us to save templates, and that is exactly what we are going to do in Illustrations C6 and C7. Click the save button and you will be prompted to enter a name. This is very important. You want to be able to read templates quickly. For this imposition I listed page size
11 x 8.5 12 up no bld 2s. Next time you have a business card that has the same specs, you can use this template. You will know it's good.
 |
| C5 Trim Marks!! |
 |
| C6 Save our imposition |
 |
| C7 Saved with Name. Note naming convention |


No comments:
Post a Comment